
Most of my videos have almost exclusively featured independent head and weapon tracking, and while this isn’t technically a requirement to play with the mod, it’s definitely the most fun and immersive way to play through the mod.
This guide will take you all the way from “that video looks interesting” to playing it yourself if you’re willing to buy the necessary components. This tutorial does make the assumption that you have an Oculus Rift as your HMD which should work out of the box with the mod for head tracking. Don’t let the length of this deter you, once you have everything initially set up, the actual process of playing the game is as simple as pushing the button on the controller, starting the game and putting on your rift.
The Hardware
In addition to the Oculus rift, you’ll need a handful of off-the-shelf (or internet) bits of hardware to get the mod working with independent head and weapon tracking.
The Gun Controller
 I’ve tried a handful of gun controllers but the so far the only one that’s been cost effective is the xbox 360 version of the Top Shot Elite. You can pick it up for anywhere between $40-50 typically. You’ll also need an xbox 360 controller wireless adapter if you don’t already have one, they typically run for around $15 online.
The controller should be plug-and-play and is recognized by your computer as an xbox 360 controller. You won’t need the infrared bar or the scope since the tracking so you can toss those out.
The Tracker
In my initial build (and videos online) I used Hillcrest Labs FSM-6 trackers, which are the same one that John Carmack used in his doom 3 rift demos at E3 last year. They cost $100 initially run at 120hz but you can get the 250hz firmware upgrade from Hillcrest. Unfortunately while the tracking is plenty responsive the FSM-6 only has a gyro and accelerometer but lack a magnetometer that allows it to keep a consistent directional orientation which doesn’t matter much when using a single tracker, but when using head and weapon tracking this frequently causes the gun to drift horizontally. While I’ll continue to support the hillcrest trackers for people who already have them, I wouldn’t recommend buying it at this point for VR applications.
I’ve recently migrated both my head and weapon tracking over to YEI 3-space trackers. With an update rate of 1000hz and a magnetometer that prevents drift between the two trackers, it’s a major improvement over the Hillcrest without costing much more. You can purchase them from their website http://tech.yostengineering.com for anywhere between $100 – $170 for the USB version. For $100 you’ll get just the actual chip and need a bit of soldering know-how to attach a micro-usb connector, but the more expensive version comes in a very consumer-friendly form factor with a mini-b connector. You’ll also need a usb cable for the tracker, I use a thin 15 ft usb mini-b cable, but depending on your setup you may need more length. You’ll also need to install the 3 space software package available on their site which includes the drivers.
Attaching the tracker to the gun is pretty trivial, I’d suggest having the tracker facing up with the usb port toward the back of the gun. You can just electrical tape it to the to gun-site rail with electrical tape like I did or I’m sure there are plenty of fancier ways to attach it.
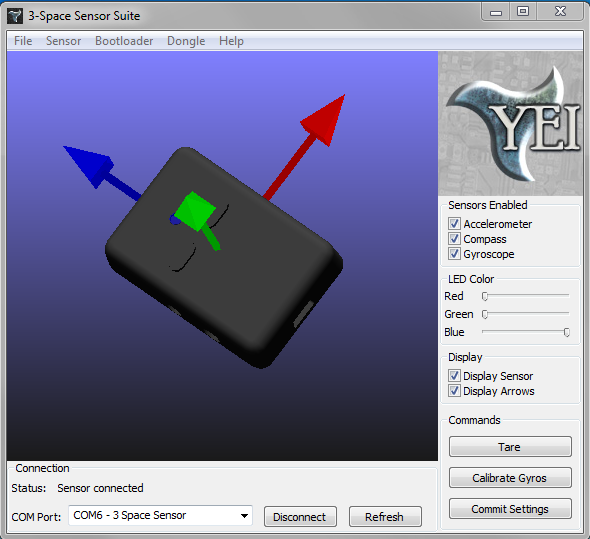
So now that you’ve got your tracker mounted and plugged in, assuming you mounted your tracker oriented the way I mentioned above, the last thing you’ll need to do is adjust the orientation using the 3-space sensor suite. Start the “3 space suite” program and connect to your device using the drop-down on the bottom.
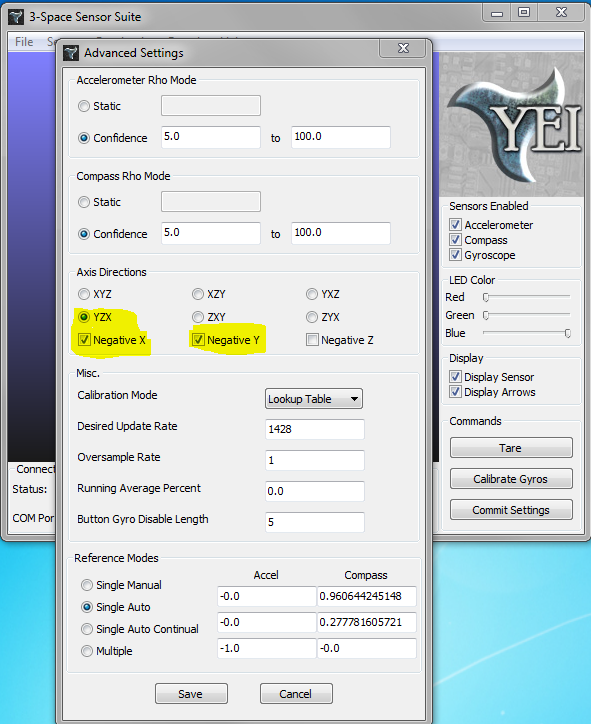
Go to Sensor -> Advanced -> Settings and adjust the axis directions to match the highlighted settings below. After saving don’t forget to commit your settings before exiting the main app (I’m pretty sure that’s necessary).
Ok, you’re through the hard parts, now it’s time to install the game.
The Software
To play the mod, you’ll need to have Half-Life 2 (and the episodes if you want them to work) installed and you’ll also need to install the source sdk 2007. Aside from that, download the latest version of the mod and run the installer. Once it’s through, you’ll need to restart steam to see the new Half-Life VR (and ep1 & 2) entries in your game list.
If you start up the game with the gun controller on, my default controls should already all be set. Feel free to remap whatever Here’s the general layout:
- Left Stick – Movement (sprint when clicked)
- Button Beside Left Stick – Use
- D-Pad – Up and down cycle weapons, forward is last weapon, backward is gravity gun
- Button Behind D-Pad – toggle crouch
- Right Stick – turn left and right in addition to the head tracking, you can bind up and down to things if you like but be aware, you’ll likely trigger them accidentally when turning
- Click Right Stick – recenters the weapon horizontally with the view (this was much more necessary with the hillcrest trackers, but you’ll still need to do this initially on first load since I’m not currently saving off the calibration data so you’ll want this to be handy)
- Left button behind the right stick (jump)
- Trigger – fire
- Pump – secondary fire
- Reload – ‘back” or select button on the clip (I personally like physically having to do sort of a reload movement,but it’s definitely not the most efficient place)
- Flashlight – start button on the clip
When the game loads a map for the first time, depending on how you mounted your tracker you’re weapon on-screen will likely be oriented incorrectly. Make sure your head and weapon are both level and facing the same direction and press the “L” key. Everything now should be all set for you to start playing.

The original frequency of the Hillcrest tracker is 125Hz and not 120Hz, that’s the reason why Carmack contacted them :
Then I contacted Hillcrest Labs directly and said, you know, it’s kind of unfortunate that you have a 125Hz update, either being at 120 or much higher would be better for syncing with v-sync. And that was one of those ‘it’s good to be me’ days where they knew who I was and they were kind of excited that somebody was paying this much picky attention to the details. Because most people, OK, you really don’t care if your presenter mouse has a bit of lag or filtering on that – but I was down there saying 120 would be much better than 125 updates a second.
From : http://www.eurogamer.net/articles/2012-07-09-john-carmack-on-virtual-reality-uncut
Thank you for the excellent guide! A friendly set of instructions was exactly what I was hoping for to make the investment of the hardware less scary. It’s encouraging that the setup looks so easy. I’ll be revisiting this once I get my Rift!
Nathan that looks totally wicked and beautifully detailed and I look forward to stepping through it all very shortly! Have been hanging out for you to get a blog going and hoped you’d have exactly this sort of info – love it 🙂
Hanging on every word from the Oculus team and cannot wait to get my dev kit. You might think about getting a referral code for your Amazon links – I suspect you’re going to be responsible for some increase in Amazon product purchases very shortly.
Cheers mate and looking forward to the coming experimental VR future storm…
Really useful guide, thanks. A couple of requests: 1) installer URL – could you include it in the blog article please? 2) I have 2xYEI and was thinking of using one for the gun, another for body tracking, and then the rift for headtracking – are you planning to support a configuration like that?
Also some thoughts (which I’m planning to implement in my tech demonstrator): 1) tilting your head to the right activates the weapon zoom/ironsights, 2) having a configurable null-zone for the sensors – i.e. to ignore slow drifting errors and only use movements beyond a certain magnitude.
Thanks, I’ll update the guide. Several people have requested the body tracking input channel, are you planning on putting it up between your shoulder blades? I was planning on trying something like that to extend the head/neck model to include a model for leaning at the waste, and with the additional tracker you’ll be able to have body relative movement instead of having to use the view.
I’d love to see your tech demo, you method of iron-sighting is exactly what I was planning on trying but I haven’t gotten around to it yet.
I was initially thinking of base of the neck, however the more I think of it, mounting it on a belt and the base of the spine may make more sense. The idea is that the head looks, whereas the body-mounted controls movement direction. I hadn’t thought of leaning – that’s a great idea! I’m also looking at kneeling and crawling, and am also intrigued by AR possibilities.
I’m new to game design and don’t have a single artistic bone in my body, so whatever I make is going to be ugly, but I’ll definitely post up open-source whatever I do. I’ll post on here if I remember, and will also put it on my blog at kingtut666.wordpress.com